Monday, October 28, 2013
Connecting parameters for L2TP/IPsec VPN
You can quickly configure your L2TP/IPsec VPN Client by using the following parameters if you have already known how to set up.- IP Address : 198.23.143.147
- or
- IP Address : 125.192.215.175
- Username: vpn,
- Password: vpn
- Pre-shared Key (Secret): vpn
On this instruction, every screen-shots are taken on Android 4.x. Other versions of Android 4.x are similar to be configured, however there might be minor different on UIs. Some third-parties customizes the configuration screens of Android.
These screen-shots are in English version Android iOS. If you use other language, you can still configure it easily by referring the following instructions.
1. Initial configurations (only once at the first time)
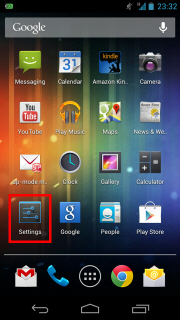
Start the "Settings" application on Android.
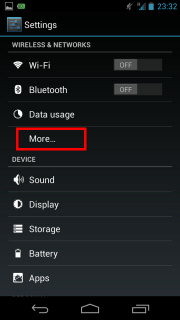
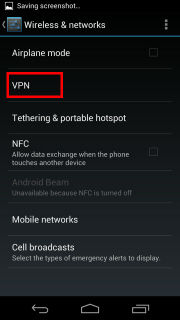
In the "Wireless & Networks" category, open "More..." and tap "VPN".
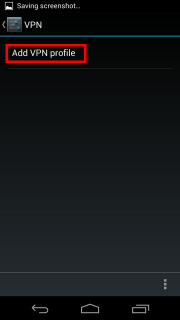
Click the "Add VPN profile" button to create a new VPN connection setting.
A new VPN connection setting editing screen will appear. Input something string on the "Name" field (e.g. "vpn" ), and choose "L2TP/IPSec PSK" in the "Type" field.
On this screen, you have to write IP address :198.23.143.147 (GIVEN ABOVE)
Open the VPN Servers List page, and click one VPN Relay Server which you want to use. Copy the DDNS Hostname (an identifier ends with ".opengw.net" ) or IP Address (digits as xxx.xxx.xxx.xxx) and paste it on the "Server address" field on the configuration screen.

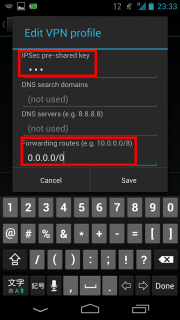
Scroll down the configuration screen, and tap the "Show advanced options" checkbox if appropriate.
Specify "vpn" (3-letters) on the "IPSec pre-shared key" field.
Specify "0.0.0.0/0" (9-letters) on the "Forwarding routes" field. Make sure that you input the "Forwarding routes" field correctly. If not, you cannot communicate via VPN.
After all inputted, tap the "Save" button and save the VPN connection setting.
2. Connect a VPN
You can start a VPN connection by using a created VPN connection setting at any time. Open the VPN connection settings list and tap a setting, you will see the following screen.
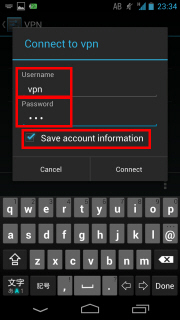
At the first time of using, you have to input "Username" and "Password" fields.(GIVEN ABOVE)
Tap "Connect" to start the VPN connection.
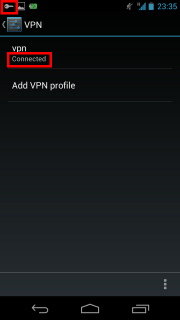
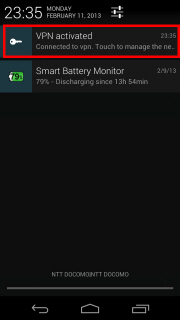
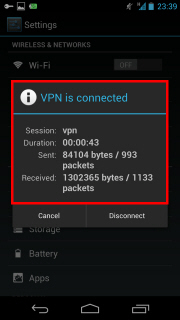
After the VPN connection will be established, the indicate string "Connected" will be displayed next to the VPN connection setting, and the status indication area of Android will show "VPN activated" message. You can tap the message to see the current status of the VPN connection.
MORE SERVERS ARE COMMING SOON KEEP IN TOUCH
Tuesday, October 22, 2013


ESET Smart Security 7 Get your hands on the latest detection technology. Try the new ESET Social Media Scanner 2 Beta. Protect yourself, your family and friends on Facebook and Twitter.
Stop heavily-encrypted threats that evade detection with Advanced Memory Scanner.
Stay protected from threats or attacks trying to exploit network vulnerabilities with Vulnerability Shield.
Eliminate extremely persistent malware and rootkits thanks to Improved Cleaning.
Stay a Safe Distance from Internet Threats
Stay protected from threats or attacks trying to exploit network vulnerabilities with Vulnerability Shield.
Eliminate extremely persistent malware and rootkits thanks to Improved Cleaning.
Stay a Safe Distance from Internet Threats
Antivirus
and antispyware help you stay safe from all types of threats. The new
Advanced Memory Scanner and Vulnerability Shield eliminate
heavily-encrypted malware that avoids detection and exploits system vulnerabilities.
Retrieve Your Missing Laptopwith Anti-Theft
Retrieve Your Missing Laptopwith Anti-Theft
Locate and
recover your lost or stolen laptop. Use the live map to track your
device and send a custom message to the finder. View all the gathered
snapshots, screenshots and locations at my.eset.com
Keep Your Private Data Safe from Identity Theft
Stop hackers from misusing your passwords and protect your bank account details with Anti-Phishing. Stay invisible to other users while connected to public Wi-Fi® and protect your data from being copied to unauthorized USB devices.
2.Click "Get License Keys"
3.Download License Keys
4.Use the given key to activate
Enjoy
Keep Your Private Data Safe from Identity Theft
Stop hackers from misusing your passwords and protect your bank account details with Anti-Phishing. Stay invisible to other users while connected to public Wi-Fi® and protect your data from being copied to unauthorized USB devices.
INSTRUCTIONS:
1.Run Software2.Click "Get License Keys"
3.Download License Keys
4.Use the given key to activate
Enjoy
TO DOWNLOAD CLICK BUTTON BELOW
DOWNLOAD
Thursday, October 17, 2013


TuneUp Utilities 2014 Improved cleaning, troubleshooting & optimizing. TuneUp Utilities 2014 takes PC optimization to the next level to keep your Windows® PC, laptop, and tablet in top shape. New features in version 2014 include:
- NEW! Flight Mode: Save more battery life and work on the go
- NEW! Duplicate Finder: Delete unwanted duplicate files
- IMPROVED! Disk Cleaner: Now cleans iTunes® and 150+ programs
- IMPROVED! User Interface: Now even easier to optimize your PC
Symptoms: Your PC is running out of disk space quickly, even though you’ve removed temporary data with our improved Disk Cleaner!
Cause: Over time, a lot of unnecessary clone files accumulate on your hard disk. These could be backup copies of files you forgot, photos you accidentally saved twice, or personal videos you cloned for editing – but also many programs regularly clone files that you don’t need!
Solution: With Duplicate Finder, you’ll easily find duplicate files across your entire hard disk. Cloned photos, music titles, videos, documents – no matter what file type, we’ll help you figure out which version of the file you need and which you can safely delete. You’ll often get back gigabytes of unnecessary data in no time.
TuneUp Flight Mode
Problem: You’re on your flight and your battery runs out much sooner than usual.
Cause: Even in regular “Economy Mode”, Wi-Fi & Bluetooth® devices continue to search for connections. This consumes battery and may even affect airplane electronics.
Solution: Just hit the Flight Mode switch to turn off all power-sapping wireless devices and save even more battery life than with Economy Mode. Flight Mode is your ultimate power saver, but it’s not just for frequent flyers: Whenever you need to squeeze the last bit out of your battery to finish that last movie or project on the road, Flight Mode is for you. Here’s what it includes:
Reduced processor power consumption: Flight Mode reduces your processors’ performance and optimizes their power consumption for maximum battery life and sufficient power for basic, everyday use.
Great power savings for your devices: Flight Mode reduces the power consumption of many built-in devices.
Turn off energy-sapping programs: Flight Mode switches off unnecessary background processes that slow PC performance down.
Turns off wireless devices: Completely disables Wi-Fi & Bluetooth devices instantly just by flipping a switch. This will significantly prolong your battery life. and many more!
INSTRUCTIONS:
1.First Install Setup
2.Open KEYGEN Folder and Generate key and Done
To Download Click Button Below
DOWNLOAD
Tuesday, October 15, 2013


CCleaner Business Edition is the easiest way to make your PC instantly faster. It makes PCs run Clean, Safe and Fast!
Whether you have a single computer or several, deploy CCleaner Business Edition in your office for a dramatic improvement in productivity and computer safety.
Whether you have a single computer or several, deploy CCleaner Business Edition in your office for a dramatic improvement in productivity and computer safety.
- Instantly faster PC
- One-Click cleaning
- Faster web browsing
- Eliminates tracking info and super cookies
- Faster PC boot up
- Get ‘like new’ performance without buying new PC
- Millions of users worldwide
Cleans all areas of your Computer
Internet Explorer
Temporary files, history, cookies, Autocomplete form history, index.dat.
Firefox
Temporary files, history, cookies, download history, form history.
Google Chrome
Temporary files, history, cookies, download history, form history.
Opera
Temporary files, history, cookies.
Safari
Temporary files, history, cookies, form history.
Windows
Recycle Bin, Recent Documents, Temporary files and Log files.
Registry Cleaner
Advanced features to remove unused and old registry entries.
INSTRUCTIONS:
1. Install Setup
2. Double click one of the given cmd files to activate according to the version you need to activate
Enjoy:-) and
Remember me in Your Prayers.
2. Double click one of the given cmd files to activate according to the version you need to activate
Enjoy:-) and
Remember me in Your Prayers.
To DOWNLOAD CLICK BUTTON BELOW
Subscribe to:
Posts (Atom)